Are you tired of paying boutique prices for unique jewelry? Do you want to express your creativity while creating beautiful accessories? Learning how to make necklaces at home is easier than you might think. Whether you’re a complete beginner or have some crafting experience, this comprehensive guide will walk you through 10 stunning necklace styles you can create with simple materials and basic techniques.
DIY jewelry making isn’t just affordable. It’s also incredibly satisfying. Imagine the pride of wearing a necklace you designed and crafted yourself or the joy of giving a handmade piece to someone special. From elegant beaded strands to bohemian macramé and modern resin pendants. These step-by-step tutorials will help you create professional-looking necklaces without expensive equipment or years of practice.
Now, it’s time to dive into the wonderful world of DIY necklace-making!
Introduction to DIY Necklace Making
Want unique, handmade necklaces without the boutique price? DIY jewelry is easier than you think!
There’s something special about wearing jewelry you’ve made yourself. Each piece tells a story, your story, and reflects your style in ways that mass-produced accessories simply cannot. Making necklaces at home allows you to create exactly what you want, whether that’s following current trends or designing something completely original.
Read Also: The Ultimate Guide to Choker Necklaces
Why And How to Make Necklaces at Home?
Making your necklaces offers numerous benefits:
- Cost-effective: DIY necklaces typically cost a fraction of retail prices
- Customizable: Create pieces that perfectly match your wardrobe and style
- Gift-worthy: Handmade jewelry makes thoughtful, personal presents
- Sustainable: Reduce waste by upcycling materials or choosing eco-friendly options
- Therapeutic: Jewelry making can be a relaxing, mindful activity
- Skill-building: Learn techniques that can grow into a fulfilling hobby or even a side business
Essential Tools and Materials for Necklace Making
Before diving into specific projects, let’s cover the basic supplies you’ll need for most DIY necklace styles:
Basic Tools:
- Wire cutters
- Round-nose pliers
- Chain-nose pliers
- Scissors
- Measuring tape or ruler
- Bead mat (optional but helpful)
Common Materials:
- Beading wire or thread
- Clasps (lobster clasps, toggle clasps, etc.)
- Jump rings
- Crimp beads
- Beads (glass, wood, plastic, metal, etc.)
- Pendants or charms
- Chain (various styles and weights)
- Cord (leather, cotton, silk, etc.)
Pro Tips
Always buy extra materials; you’ll inevitably make mistakes or want to make another piece.
Take photos of your designs before disassembling if you need to start over
Work over a bead mat or towel to prevent beads from rolling away
Invest in proper storage solutions (compartmentalized boxes) to keep materials organized
Natural light produces the best results when working with small components
Keep a small notebook to record successful techniques and material combinations
Now that we’ve covered the basics, let’s explore 10 beautiful necklace styles you can create at home!
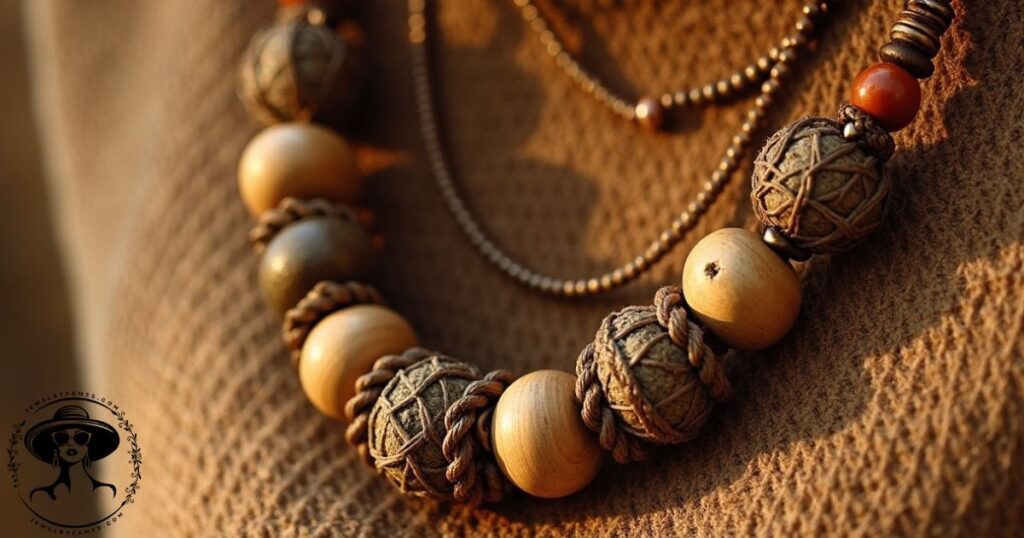
Simple & Elegant Beaded Necklaces for Beginners
Beaded necklaces are perhaps the most versatile and beginner-friendly DIY jewelry project. With endless combinations of bead types, sizes, and patterns, you can create pieces ranging from minimalist to statement-making. Let’s start with this classic style that forms the foundation of many jewelry-making techniques.
Materials Needed for Beaded Necklaces:
- Beading wire (flexible wire with nylon coating)
- Beads of your choice (glass, wood, gemstone, etc.)
- Crimp beads
- Jump rings
- Lobster clasp or toggle clasp
- Wire cutters
- Chain-nose pliers
- Round-nose pliers
- Ruler or measuring tape
Step-by-Step Beaded Necklace Tutorial:
- Measure and cut the wire: Decide how long you want your finished necklace to be, then add about 4 inches for securing the clasp. Standard necklace lengths range from 16 inches (choker) to 24 inches (opera length).
- Plan your bead pattern: Before stringing, arrange your beads on a flat surface or bead mat to visualize the finished design. Consider color, size, and texture variations for visual interest.
- Add a crimp bead and clasp: Thread a crimp bead onto your wire, then loop the wire through one end of your clasp and back through the crimp bead. Pull tight to create a small loop, leaving about 1/4 inch of tail.
- Secure the crimp: Use chain-nose pliers to flatten the crimp bead, securing the clasp in place. Trim any excess wire.
- String your beads: Following your planned pattern, thread beads onto the wire until you reach your desired length (remember that you’ll need space to attach the other end of the clasp).
- Finish the necklace: Thread another crimp bead, loop the wire through a jump ring (which will connect to your clasp), and loop back through the crimp bead. Adjust the tension so the necklace hangs properly, then flatten the crimp bead and trim excess wire.
Pro Tip:
- Odd numbers of focal beads create more visually appealing arrangements
- Mix bead sizes for texture and visual interest
- Pre-arrange your pattern on a flat surface before stringing
- Double-check all crimps before trimming excess wire
- Use bead stoppers to prevent beads from falling off while working
Common bead types and their characteristics:
| Bead Type | Characteristics | Best For |
| Glass | Smooth, colorful, reflective | Elegant, dressy designs |
| Wood | Lightweight, natural, earthy | Casual, bohemian styles |
| Metal | Shiny, substantial, durable | Mixed-media, edgy looks |
| Crystal | Sparkly, faceted, catches light | Special occasion pieces |
| Gemstone | Natural variation, unique patterns | Higher-end statement pieces |
| Polymer clay | Customizable, lightweight | Whimsical, colorful designs |
Remember that beaded necklaces don’t have to be complex to be beautiful. Even a simple strand of uniform beads can make a striking necklace, especially when you choose high-quality or unusual beads as your focal point.
Boho-Chic Macramé Necklace in 15 Minutes
If you’re looking for a DIY necklace with texture and a bohemian flair, macramé is your answer! This knotting technique creates beautiful patterns without requiring any special equipment. The best part? You can create a stunning macramé necklace in just 15 minutes once you master a few basic knots.
Materials Needed for Macramé Necklaces:
- Cotton cord or hemp twine (2-3mm thickness works well)
- Wooden, stone, or ceramic beads with large holes
- Scissors
- Measuring tape
- Clipboard or tape (to secure your work)
Step-by-Step Macramé Necklace Tutorial:
- Prepare your cords: Cut four pieces of cord, each about 24 inches long (for a necklace that can be adjusted to different lengths).
- Create a starting point: Fold two cords in half to create a loop. Secure this loop to your clipboard or tape it to a flat surface.
- Begin with a lark’s head knot: Take the third cord, fold it in half, and place the folded end behind your secured loop. Pull the ends of the third cord through the loop, creating a lark’s head knot. Repeat with the fourth cord.
- Create square knots: Take the outermost left cord and place it over the two middle cords, then under the outermost right cord. Next, take the outermost right cord and thread it under the two middle cords and up through the loop created by the left cord. Pull tight. Repeat this process, but start from the right side this time. This completes one square knot.
- Incorporate beads: After creating several square knots (or any pattern you prefer), string a bead onto the two middle cords and continue knotting below it.
- Create a sliding closure: After you’ve reached your desired length, create a loop with several square knots on one end. On the other end, make a larger decorative knot that can pass through the loop, allowing the necklace to be adjustable.
- Trim and finish: Cut the excess cord and either tie small knots at the ends or add a touch of clear nail polish to prevent fraying.
Pro Tip:
- Practice basic knots on scrap cord before starting your project
- Pin your work to a corkboard to maintain tension while knotting
- Use colored cords for a pop of personality
- Wax your cords slightly to prevent fraying
- Mist cotton cords lightly with water when working for tighter knots
Macramé necklaces can be as simple or as complex as you like. As you become more comfortable with the basic knots, you can experiment with different knotting patterns, incorporating beads at various intervals or even attaching a special pendant to your creation.
Customizable Resin Pendant Necklace
Resin jewelry has exploded in popularity, and for good reason. It allows for incredible creativity and personalization. With resin, you can create unique pendants by embedding flowers, glitter, photos, or other small treasures in a crystal-clear medium. While this technique requires a bit more patience than some other methods, the results are stunning and truly one-of-a-kind.
Materials Needed for Resin Necklaces:
- Two-part epoxy resin kit (specifically for jewelry making)
- Silicone pendant molds in various shapes
- Mixing cups and stir sticks
- Resin colorants or mica powders (optional)
- Small items to embed (dried flowers, glitter, small charms, etc.)
- Chain or cord
- Jump rings
- Clasps
- Small hand drill or pin vise (for creating holes)
- Disposable gloves
- Toothpicks (for positioning items and removing bubbles)
Step-by-Step Resin Pendant Tutorial:
- Prepare your workspace: Cover your work area with a plastic sheet and ensure good ventilation. Resin can be messy, and the fumes should not be inhaled directly.
- Plan your design: Arrange the items you want to embed in your resin. Consider color combinations and how the elements will look when suspended in the clear resin.
- Mix the resin: Following the manufacturer’s instructions (this is crucial!), mix equal parts of resin and hardener in a disposable cup. Stir slowly for about 3-5 minutes to avoid creating air bubbles.
- Add color (optional): If desired, divide your mixed resin into smaller cups and add a tiny amount of colorant to each. A little goes a long way!
- Pour a base layer: Pour a thin layer of resin into your mold and let it set until tacky (usually 30 minutes to an hour, depending on the resin).
- Add your elements: Carefully place your dried flowers, glitter, or other items onto the tacky base layer. Use a toothpick to position them precisely.
- Pour the final layer: Gently pour the remaining resin over your embedded items until the mold is filled. Use a toothpick to pop any air bubbles that rise to the surface.
- Cure the resin: Cover your work with a dust cover and allow the resin to cure according to the package directions (typically 24-72 hours for a full cure).
- Demold and finish: Once fully cured, carefully remove your pendant from the mold. If needed, sand any rough edges with fine-grit sandpaper and polish with resin polish.
- Add a hole: Use a small hand drill or pin vise to create a hole for the jump ring.
- Attach to a chain: Thread a jump ring through the hole and attach your pendant to a chain or cord of your choice.
Pro Tip:
- Work in a dust-free environment with good ventilation
- Embed dried flowers for a floral touch
- Warm your resin bottles in warm water before mixing for easier pouring
- Use a heat gun or torch (briefly) to remove bubbles
- Mix resin in small batches rather than one large amount
Working with resin requires patience and some practice, but the results are worth it. Your finished resin pendant necklace will be a true conversation piece that perfectly preserves a tiny work of art.
Artistic Wire-Wrapped Necklace in 5 Steps
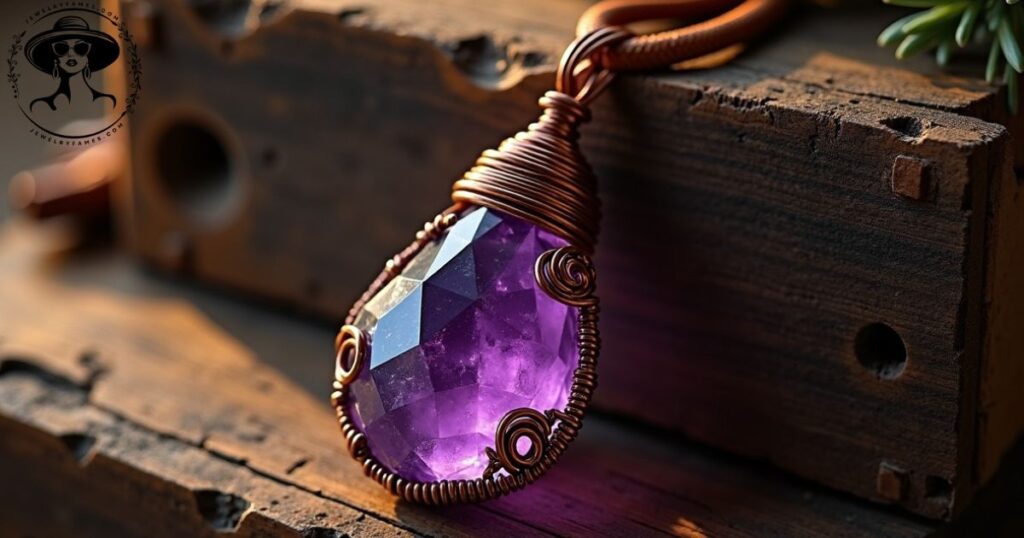
Wire-wrapped jewelry has an artistic, handcrafted appearance that’s impossible to replicate with mass production. While it might look complex, basic wire wrapping is quite approachable for beginners. With just a few simple tools and techniques, you can create a professional-looking pendant that showcases a beautiful stone or crystal.
Materials Needed for Wire-Wrapped Necklaces:
- Craft wire (20-22 gauge for the frame, 26-28 gauge for wrapping)
- A focal stone, crystal, or sea glass with an interesting shape
- Round-nose pliers
- Chain-nose pliers
- Wire cutters
- Chain or cord for the necklace
- Jump rings
- Clasp
Step-by-Step Wire-Wrapped Pendant Tutorial:
- Prepare your wire: Cut approximately 12 inches of your thicker frame wire (20-22 gauge). This will create the basic structure that holds your stone.
- Create the base: Find the center of your wire and position your stone against it. Bend the wire up around both sides of the stone, crossing at the top to create an “X” shape above the stone.
- Secure the stone: Bend the remaining wire across the back of the stone and then up again to the front, creating a cage-like structure. Make sure the wire is snug against the stone but not too tight.
- Add decorative wrapping: Cut a piece of your thinner wire (about 24 inches) and use it to wrap around the frame wire, securing all the joints where wires cross. Create decorative loops and swirls with your remaining frame wire.
- Finish the pendant: Create a small loop at the top of your pendant for hanging. Cut any excess wire, making sure to tuck in the ends so they won’t snag on clothing. Attach your pendant to a chain or cord using a jump ring.
Pro Tip:
- Use copper wire for a vintage look and easier manipulation
- Practice consistent wire tension for professional results
- Use nylon-jaw pliers to avoid marking your wire
- Create wire templates for repeated elements
- Tumble the finished pieces in a rock tumbler for professional hardness and shine.
The beauty of wire wrapping is that each piece is unique. Even if you try to make two identical pendants, subtle differences in your wrapping technique will give each one its character. Embrace this organic quality and let your creativity guide your design.
Popular wire types for jewelry making:
| Wire Type | Characteristics | Best For |
| Copper | Soft, malleable, warm tone | Beginners, rustic designs |
| Silver-filled | Good quality, tarnish-resistant | Everyday wear, semi-precious stones |
| Sterling silver | Excellent quality, valuable | Fine jewelry, special pieces |
| Aluminum | Very lightweight, colorful | Large pieces, bold designs |
| Artistic wire (coated) | Variety of colors, non-tarnishing | Colorful, playful designs |
Wire wrapping is a skill that improves with practice, so don’t be discouraged if your first attempts aren’t perfect. Each piece you make will be better than the last!
Must-See It: How to Clean Necklaces
Edgy & Minimalist Leather Cord Necklace
For those who prefer minimalist jewelry with a touch of edge, leather cord necklaces offer the perfect combination of simplicity and style. These necklaces work beautifully for all genders and can be dressed up or down, depending on the pendant and finish you choose. Best of all, they require almost no special tools to create!
Materials Needed for Leather Necklaces:
- Leather cord (1.5-2mm thickness works well)
- Pendant or focal piece with a large enough hole for your cord
- Scissors
- Ruler
- Jewelry glue (optional)
- Cord ends and clasp (optional)
Step-by-Step Leather Cord Necklace Tutorial:
- Measure and cut the cord: Decide on your desired necklace length (typically 16-20 inches) and cut your leather cord, adding about 4 extra inches for knots or findings.
- Add your pendant: Thread your pendant onto the cord, positioning it at the center.
- Create an adjustable closure (Option 1): The simplest method is to tie an overhand knot at each end of the cord. Thread both ends through a large bead with a hole large enough for two cords. This creates a sliding closure that can be adjusted for length.
- Create a fixed closure (Option 2): For a more finished look, attach cord ends to both ends of your leather using jewelry glue. Once dry, connect one end to a clasp and the other to a jump ring.
- Finish the ends: If using the knotted method, trim any excess cord and seal the knot ends with a tiny drop of clear nail polish or jeweler’s glue to prevent fraying.
Pro Tip:
- Add metal charms for an appealing contrast with leather
- Seal cord ends with clear nail polish to prevent fraying
- Punch holes with a heated needle for cleaner results
- Gently sand edges of cut leather for a finished look
- Use beeswax on leather cord for increased durability
Leather cord necklaces are particularly effective when paired with a statement pendant. The simplicity of the cord allows the pendant to take center stage. Consider these pendant options for your leather necklace:
- Natural stone or crystal (drill a hole or use a wire-wrapped setting)
- Metal pendant with tribal or geometric designs
- Wooden carved piece
- Found objects (coins, keys, unique buttons)
- Polymer clay creations
Types of leather cord and their characteristics:
| Leather Type | Characteristics | Best For |
| Round leather | Classic look, smooth finish | Traditional pendants, everyday wear |
| Flat leather | Modern sits closer to the eck | Wider pendants, contemporary styles |
| Braided leather | Textural interest, stronger | Heavier pendants, rustic looks |
| Suede leather | Soft, velvety finish | Casual, boho styles |
| Metallic leather | Shiny, eye-catching | Special occasions, bold looks |
The beauty of leather cord necklaces lies in their versatility and ease of creation. They make excellent entry points into jewelry-making because they require minimal tools and materials while yielding professional-looking results.
Custom Layered Chain Necklace
Layered chain necklaces are having a major fashion moment, and creating your custom version is surprisingly simple. By combining different chain styles, lengths, and decorative elements, you can design a necklace that perfectly suits your style, whether that’s minimalist, bohemian, edgy, or glamorous.
Materials Needed for Chain Necklaces:
- Assorted chains in different styles and weights
- Jump rings (various sizes)
- Lobster clasp or toggle clasp
- Charms or pendants (optional)
- Wire cutters
- Chain-nose pliers (two pairs are helpful)
- Ruler or measuring tape
Step-by-Step Layered Chain Necklace Tutorial:
- Select your chains: Choose 2-4 chains in complementary styles but with sufficient contrast. Consider mixing thin with thick, shiny with matte, or different metal colors.
- Determine lengths: For a layered effect, each chain should sit at a different level. A good rule of thumb is to space them about 1-2 inches apart in length. For example: 16 inches, 18 inches, and 20 inches.
- Cut your chains: Measure and cut each chain to your desired length, plus about 1/2 inch extra on each end for attaching findings.
- Add decorative elements: Before connecting the ends, consider adding small charms, beads, or pendants to some or all of your chains. Simply thread them onto the chain links using jump rings.
- Connect the chains: Using jump rings, attach all chain ends to a single jump ring on each side of the necklace.
- Add closure: Attach your clasp to one side and a jump ring to the other side of the necklace. Make sure the jump ring is large enough to accommodate all your chains plus the clasp.
- Check for tangles: Gently manipulate your necklace to ensure the chains lay properly and don’t tangle excessively. If needed, you can add small connecting jump rings between chains at strategic points to keep them from tangling.
Pro Tip:
- Mix gold and silver for trendy, versatile pieces
- Store chains hanging to prevent tangling
- Use chain nose pliers for opening jump rings; never pull them apart
- Layer odd numbers of chains for the most pleasing effect
- Add a few beads to chain links for customized sparkle
Popular chain styles and their characteristics:
| Chain Type | Characteristics | Best For |
| Cable chain | Simple, classic links | Everyday wear, pendants |
| Rope chain | Twisted links, catches light | Adding texture, dressy looks |
| Box chain | Square links, strong | Supporting heavier charms |
| Singapore chain | Twisted diamond-cut links | Delicate, sparkly effect |
| Figaro chain | Pattern of different-sized links | Italian-inspired designs |
| Paperclip chain | Elongated links, modern | Contemporary, minimalist styles |
Remember that your layered chain necklace doesn’t need to be symmetrical. Creating different focal points on each chain. Perhaps a small pendant on one, a few beads on another, and leaving one plain adds visual interest and prevents the piece from looking too uniform.
Soft & Stylish Fabric Yarn Necklace
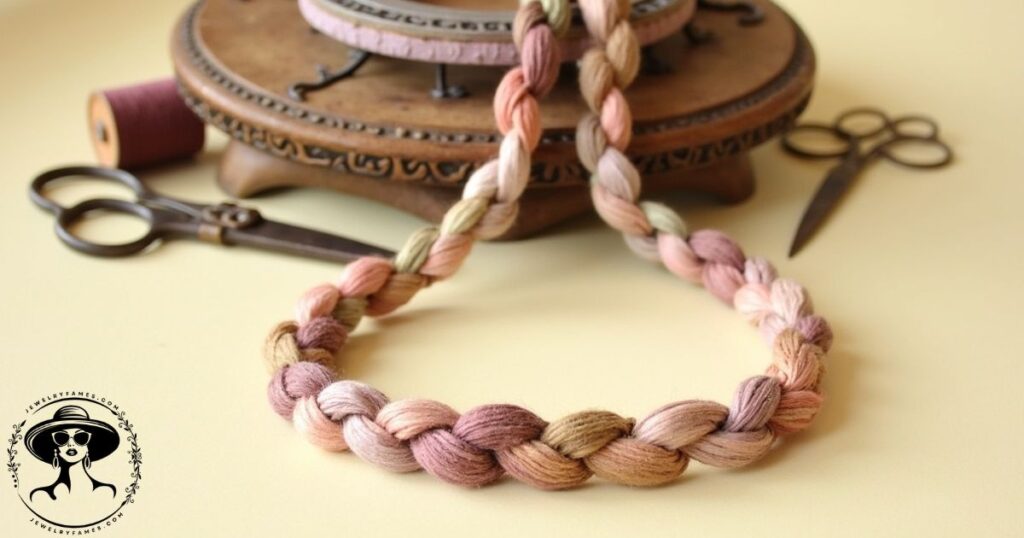
If you’re looking for a unique necklace style that’s lightweight and colorful, fabric yarn necklaces are a wonderful option. These textile-based pieces are perfect for summer, add a pop of color to any outfit, and can be created without any special jewelry-making tools. They’re also a great way to upcycle old T-shirts or fabric scraps into something beautiful!
Materials Needed for Fabric Necklaces:
- Old T-shirts or jersey fabric (stretchy fabric works best)
- Fabric scissors
- Beads with large holes
- Ruler
- Safety pin (optional, for threading)
Step-by-Step Fabric Yarn Necklace Tutorial:
- Create your fabric yarn: Cut your T-shirt or fabric into continuous strips about 1/2 inch wide. Stretch the strips gently to make them curl into a yarn-like material.
- Decide on your technique: There are several ways to transform fabric yarn into a necklace:
- Braided: Use three strands of fabric yarn and create a simple braid
- Twisted: Twist two different colored strands together
- Knotted: Create a series of knots along a single strand
- Wrapped: Wrap fabric yarn around a core of thicker yarn or cord
- Incorporate beads: Thread beads onto your fabric yarn as you work. For braided designs, add beads to individual strands before braiding or thread them onto the completed braid at regular intervals.
- Create a closure: The simplest method is to make the necklace long enough to slip over your head. Alternatively, create a loop at one end and a knot at the other that can pass through the loop.
- Finish the ends: Secure any loose ends with a tight knot and a small dot of fabric glue. Trim any excess fabric.
Pro Tip:
- Use old T-shirts for upcycling into fabric yarn
- Stretch fabric strips gently to create curl and texture
- Experiment with brave color combinations
- Add fabric stiffener to create more structured designs
- Incorporate wooden beads for a natural contrast with the fabric
Fabric necklaces are particularly wonderful for people with metal sensitivities, as they can be created entirely without metal components. They’re also extraordinarily lightweight, making them comfortable for all-day wear, even for those who find traditional necklaces too heavy.
Color combinations for fabric necklaces:
| Style | Color Combination | Effect |
| Monochromatic | Varying shades of one color | Sophisticated, subtle |
| Complementary | Colors opposite on the color wheel (blue/orange) | Vibrant, eye-catching |
| Analogous | Colors adjacent on the color wheel (blue/green) | Harmonious, natural |
| Neutral + Pop | Beige/white with one bright color | Balanced, versatile |
| Ombré | Gradual transition between colors | Trendy, artistic |
Don’t be afraid to experiment with unusual color combinations; that’s part of the fun of creating your fabric necklaces!
Classic Pearl Strand (Like a Pro)
There’s something timeless about a pearl necklace. Whether you’re going for classic elegance or a modern interpretation, creating your pearl strand allows you to customize the length, pearl size, and overall style while saving significantly compared to store-bought versions. With a few specific techniques, you can achieve professional-looking results.
Materials Needed for Pearl Necklaces:
- Pearls (freshwater, glass, or faux)
- Silk thread with needle attached (specifically for pearl stringing)
- Pearl knotting tweezers (optional but helpful)
- Thread conditioner (beeswax)
- Pearl clasp or standard clasp
- Scissors
- Ruler or measuring tape
- G-S Hypo Cement or other jewelry glue
Step-by-Step Pearl Necklace Tutorial:
- Prepare your thread: Cut a length of silk thread about 10 inches longer than your desired necklace length. Condition the thread by running it across beeswax, which strengthens it and helps prevent fraying.
- Attach the clasp: Thread your needle through one end of the clasp, leaving about a 3-inch tail. Tie a secure knot and apply a tiny drop of glue to the knot. Let it dry completely.
- String with knots: Thread your first pearl onto the silk. Push it all the way down to the clasp, then create a knot right against the pearl. The traditional technique uses pearl knotting tweezers: make a loop with the thread, insert the tweezers into the loop, slide the loop down to the pearl, and pull tight while removing the tweezers.
- Continue the pattern: Add the next pearl, make another knot, and continue until all pearls are strung. The knots serve a crucial purpose; they prevent all the pearls from falling off if the strand breaks, and they keep the pearls from rubbing against each other.
- Finish the necklace: After your last pearl and knot, thread through the other side of the clasp. Tie a secure knot, add a small drop of glue, and trim the excess thread when dry.
- Polish the pearls: Gently wipe your completed necklace with a soft cloth to remove any fingerprints and enhance the natural luster of the pearls.
Pro Tip:
- Use faux pearls for affordability with similar elegance
- Always knot between pearls to prevent loss if the strand breaks
- Condition your silk thread with beeswax for strength
- Select graduated pearl sizes for classic elegance
- Store pearl necklaces flat to prevent stretching the silk
Types of pearls for DIY necklaces:
| Pearl Type | Characteristics | Best For |
| Freshwater | Natural, irregular, variety of colors | Authentic pearl necklaces |
| Akoya | Round, high luster, classic white | Traditional elegant strands |
| South Sea | Large, golden or white, rare | Luxury statement pieces |
| Glass pearls | Man-made, uniform, good weight | Budget-friendly elegant pieces |
| Plastic pearls | Lightweight, inexpensive | Costume jewelry, crafts |
Remember that the beauty of pearls lies in their subtle glow rather than their sparkle. When wearing your handmade pearl necklace, you’ll find it complements virtually everything in your wardrobe, from casual jeans to formal attire.
Personalized Charm Necklace in 10 Minutes
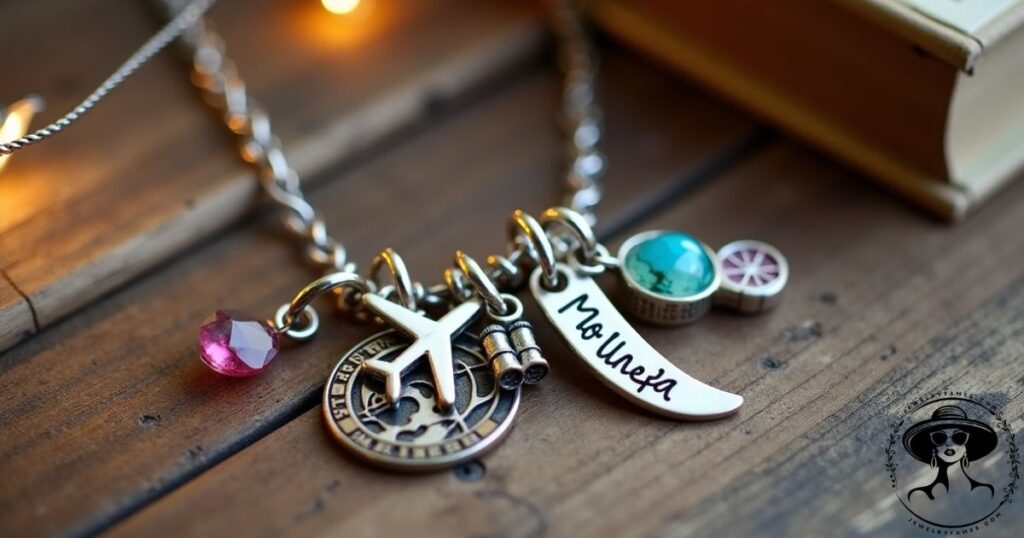
A charm necklace is perhaps the most personal type of jewelry you can create. Each charm can represent something meaningful: a hobby, a significant date, initials, or a symbol that tells your unique story. With just a few simple components, you can design a completely customized necklace in minutes that looks like it came from a boutique.
Materials Needed for Charm Necklaces:
- Chain in your desired length and style
- Assorted charms with jump rings attached
- Additional jump rings
- Lobster clasp (if not already attached to chain)
- Chain-nose pliers (two pairs are ideal)
- Wire cutters (if you need to cut the chain)
Step-by-Step Charm Necklace Tutorial:
- Prepare your chain: If using a pre-made chain with clasps already attached, you can skip to the next step. Otherwise, measure and cut your chain to the desired length, then attach a clasp to one end and a jump ring to the other using pliers.
- Plan your charm arrangement: Lay your chain on a flat surface and position your charms along it to determine the best arrangement. Consider balance, spacing, and visual flow.
- Attach the charms: Open a jump ring by twisting it sideways (never pull it apart), thread it through both the charm and a link in your chain, and then close the jump ring securely. Repeat for each charm.
- Check the balance: Hold up your necklace or try it on to make sure the charms are positioned attractively and don’t bunch up too much in one area.
- Make final adjustments: Rearrange charms if needed, ensuring all jump rings are completely closed to prevent the loss of charms.
Pro Tip:
- Use birthstone charms for sentimental personalization.
- Balance the charm weight across the necklace
- Check that the jump rings are fully closed by giving them a gentle tug
- Layer multiple charm necklaces of different lengths
- Mix vintage and new charms for a unique character
The beauty of charm necklaces is their versatility and expandability. You can start with just one or two special charms and add more over time to commemorate new experiences, achievements, or relationships.
Ideas for meaningful charm necklace themes:
| Theme | Charm Ideas | Perfect For |
| Family | Initials, birthstones, house | Mother’s gift |
| Travel | Landmarks, maps, compass | Adventure lovers |
| Spiritual | Religious symbols, moon phases | Personal guidance |
| Nature | Animals, leaves, flowers | Outdoor enthusiasts |
| Hobbies | Sports, books, music notes | Celebrating passions |
| Milestones | Numbers, graduation caps, hearts | Marking achievements |
For an extra special touch, consider mixing vintage and new charms. Antique shops and flea markets often have unique, characterful charms that can add interest to your necklace. Combining these with modern elements creates a one-of-a-kind piece with depth and personality.
FAQ’s
What’s the easiest necklace to make for absolute beginners?
Simple beaded necklaces and leather cord necklaces are ideal for beginners as they require minimal tools and basic techniques.
How much money can I save by making my necklaces?
Depending on the style and materials, DIY necklaces typically cost 50-80% less than comparable store-bought pieces.
Where can I find unique beads and pendants?
Beyond craft stores, look at thrift shops, bead specialty stores, online marketplaces like Etsy, and even repurpose elements from old jewelry.
How do I prevent my necklace chains from tangling?
Adding small connecting jump rings between chains at strategic points for layered necklaces can help prevent tangling.
Can I sell the necklaces I make?
Absolutely! Many successful jewelry businesses began as home-based hobbies. Just be sure to consider material costs, time investment, and market research if you decide to sell your creations.
Conclusion
After exploring these 10 DIY necklace styles, you now have a comprehensive toolkit of techniques to create beautiful, personalized jewelry at home. From elegant pearl strands to bohemian macramé and modern resin pendants, each style offers unique opportunities for creative expression and skill development.
As you begin your jewelry-making journey, remember these key principles:
- Start simple: Master basic techniques before attempting complex designs
- Experiment: Don’t be afraid to mix materials and techniques for truly unique pieces
- Practice patience: Some techniques (like wire wrapping and resin) improve significantly with practice
- Personalize: The most special handmade jewelry reflects your style and story
Final Tips for Success
- Invest in quality tools: Good pliers and wire cutters make a tremendous difference.
- Buy materials in person when possible: Being able to see and feel beads, chains, and findings helps ensure you’ll be happy with the final product.
- Join online communities: Social media groups for jewelry makers offer inspiration and troubleshooting advice.ce
- Take photos of your process: Documenting your creations helps you remember successful techniques.
- Consider gifting: Handmade necklaces make thoughtful, personal presents for loved ones.